Quantcast
Channel: dashboard – Sage CRM – Tips, Tricks and Components
Viewing all 48 articles
Browse latest View live

Interactive Dashboards to help day to day CRM tasks

$
0
0

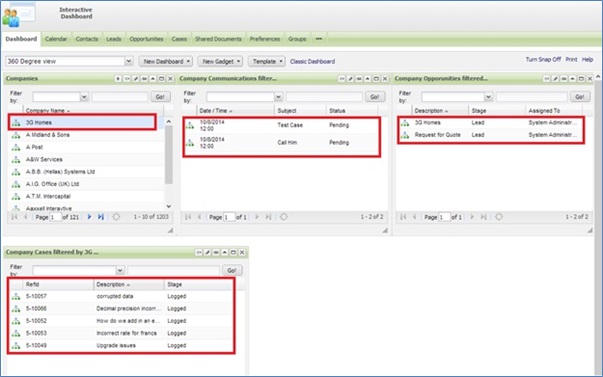
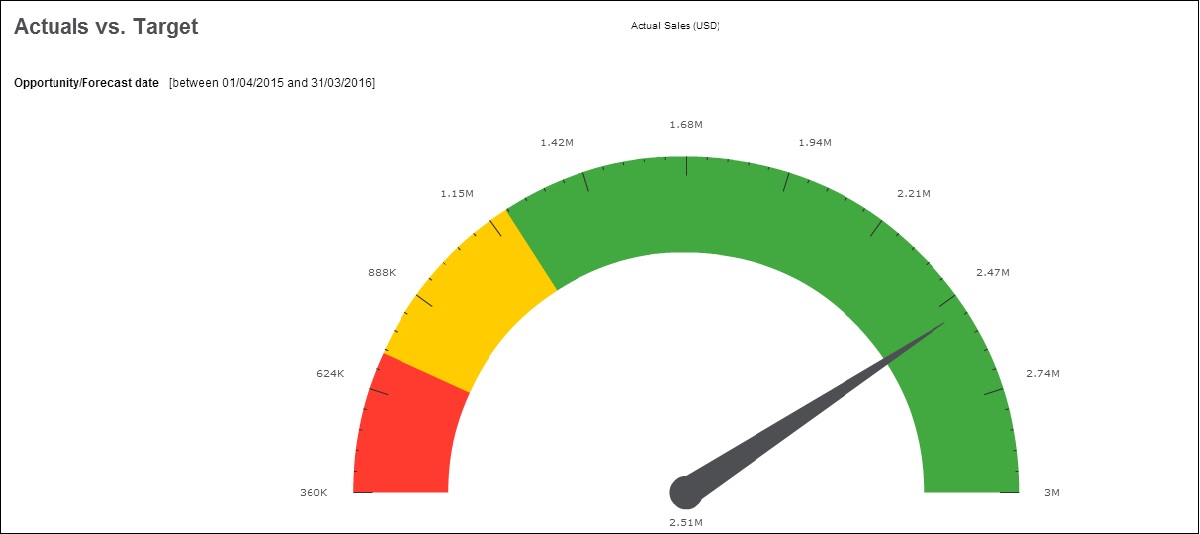
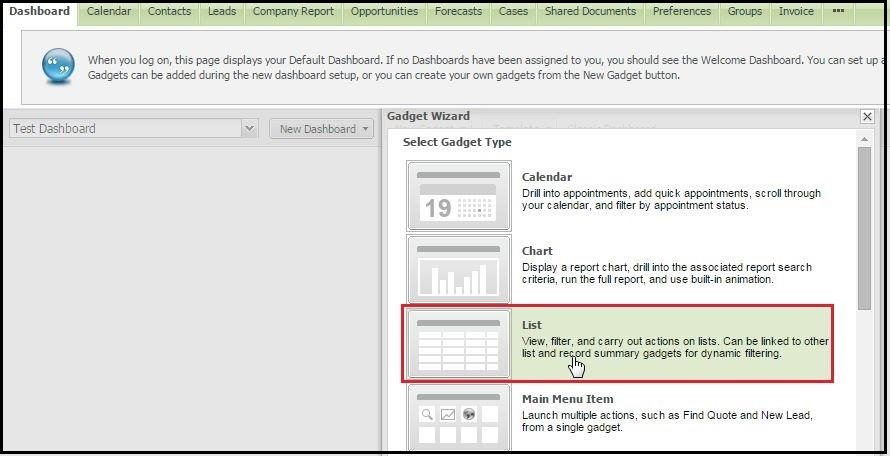
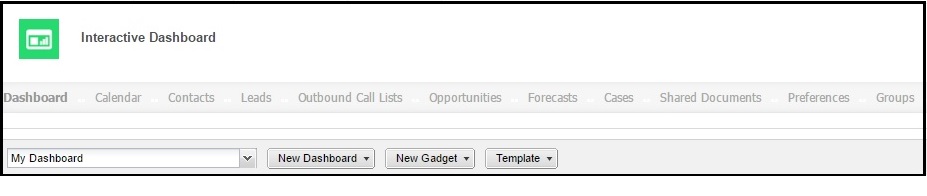
Interactive Dashboard encompasses n number of features that make the life of CRM users very easy by catering information to them in a very presentable and business friendly format. In this blog we will discuss how one can enable the functionality of Sending E-mail, Creating Task and Appointment from Sage CRM Interactive dashboards.

CRM Solution for Sage 500 :  GUMU Sage CRM – Sage 500 ERP Realtime Integration

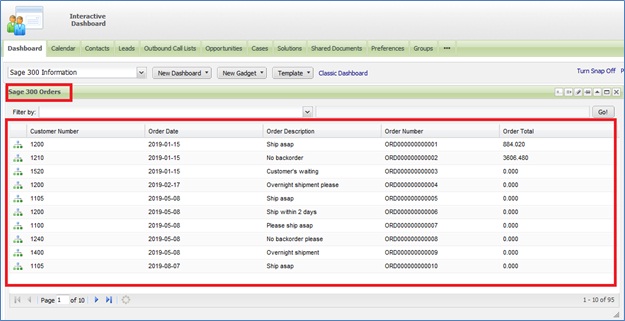
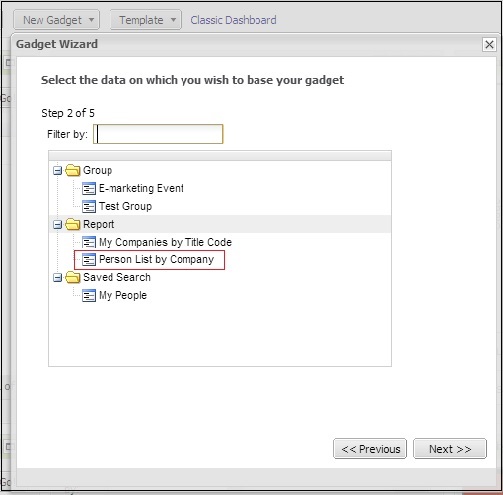
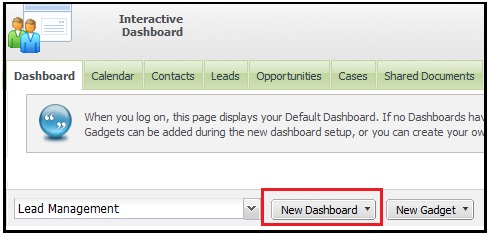
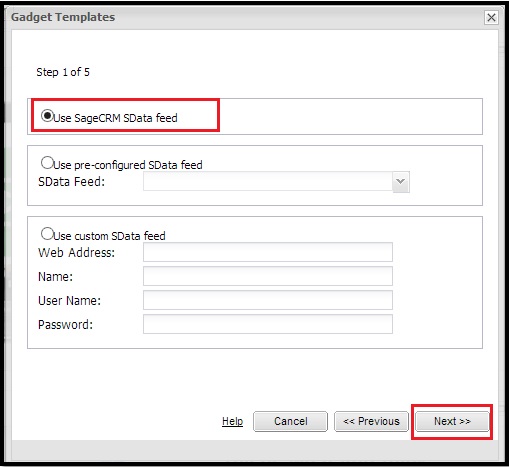
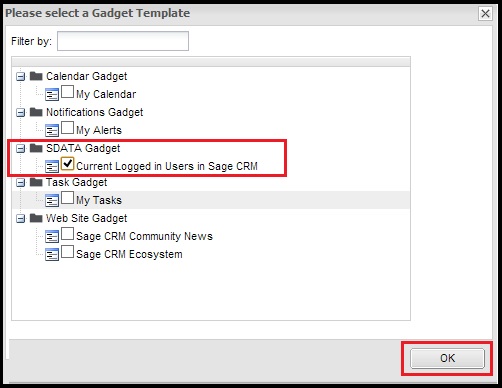
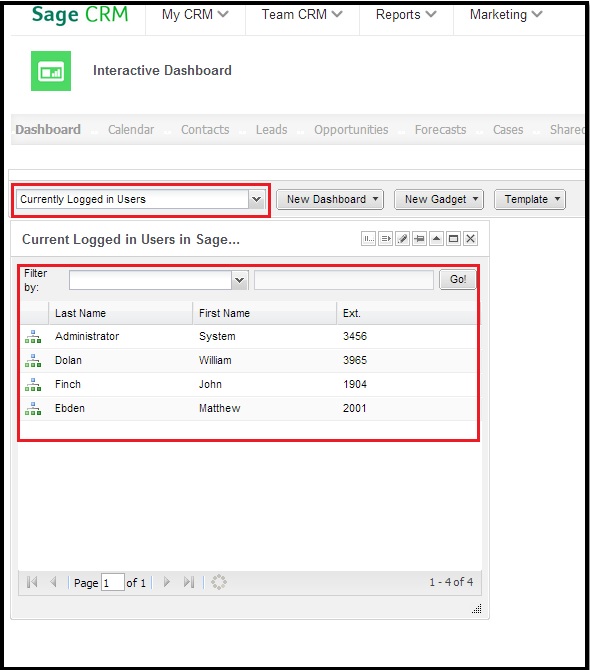
Consider you have displayed Company Information in Sage CRM dashboard by following steps mentioned in the previous blog to create a dashboard.

http://www.greytrix.com/blogs/sagecrm/2014/02/15/get-key-metrics-right-on-your-interactive-dashboard-using-saved-search/

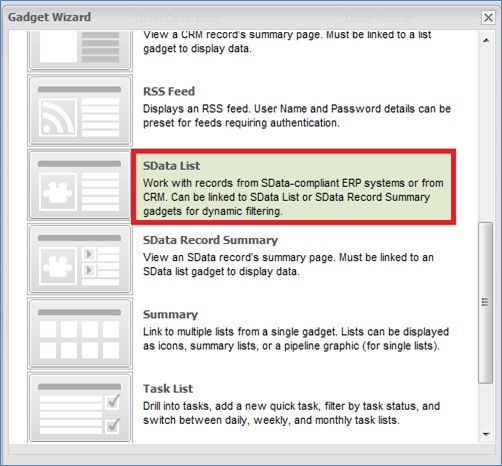
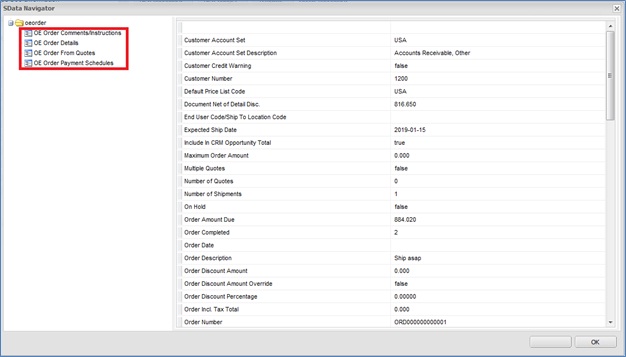
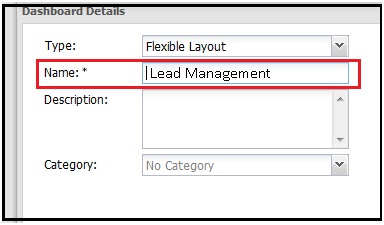
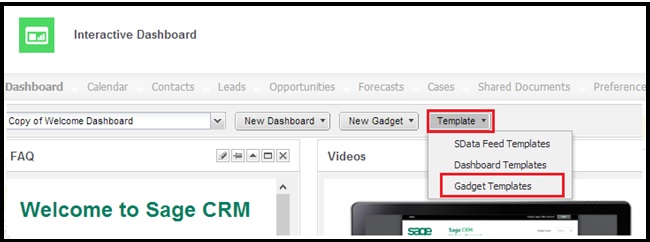
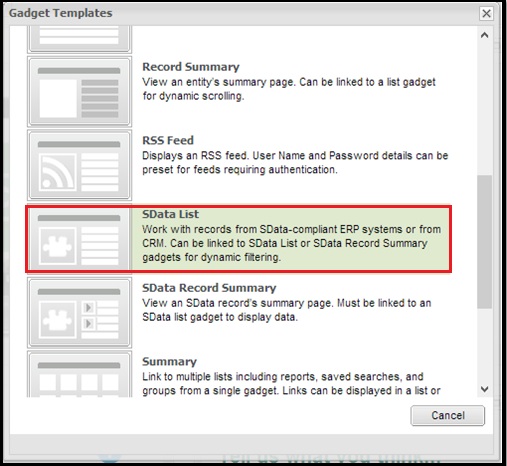
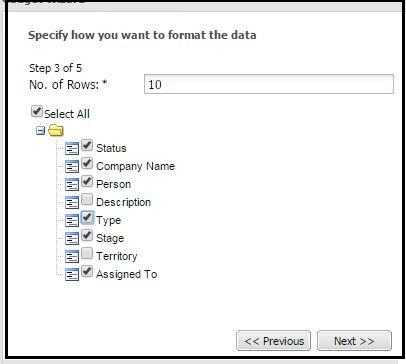
While creating the List gadget you will observe the below screen:

Img1

Our Other Blogs: Sage ERP X3 | Sage 300 ERP | Salesforce.com

Let’s see the effect of setting these options one by one in the Drill Down field.

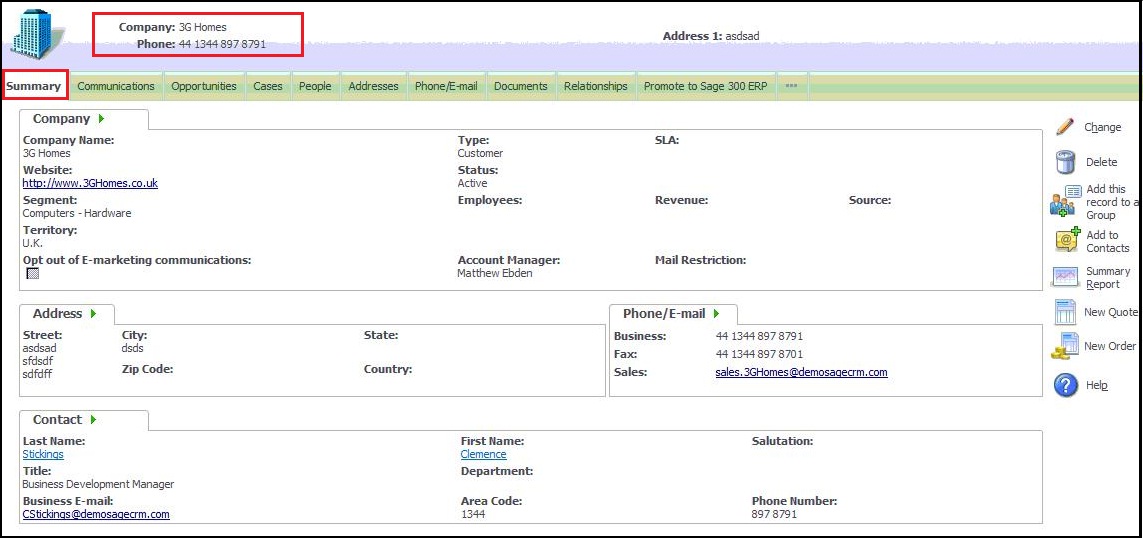
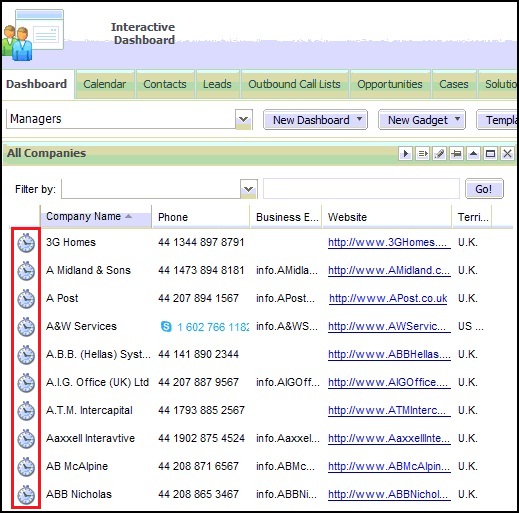
1) Drill Down = Go To Summary Screen
When you set ‘Go To’ Summary screen, gadget will display an icon in first column as shown below:Img2
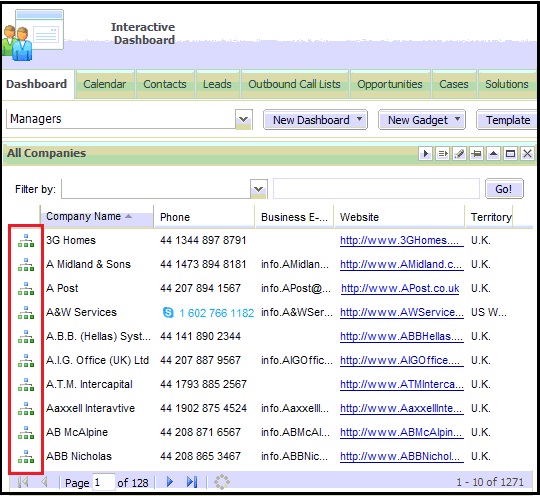
These options will simply take you to the Summary of that particular company.

Img3
2) Drill Down = LinkedIn Search
This option will search for the LinkedIn profile of the selected company in a new window.

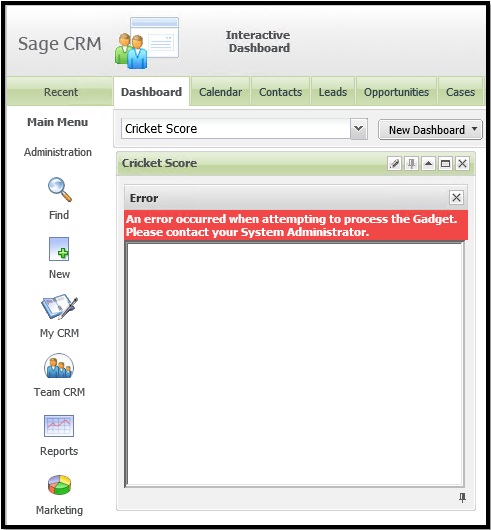
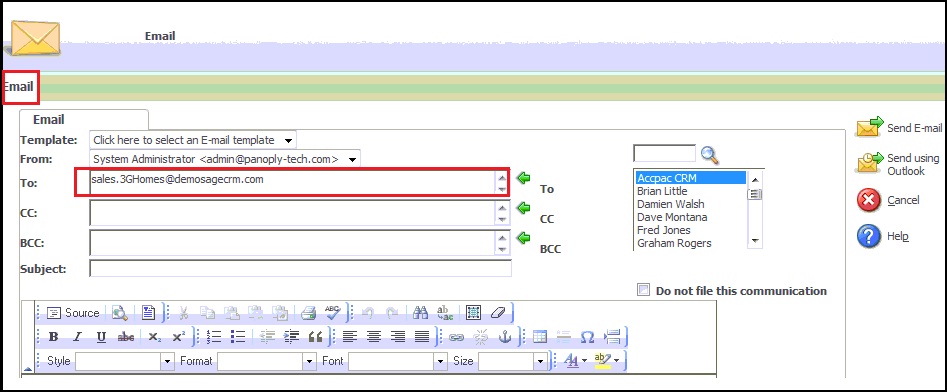
3) Drill Down = New Email
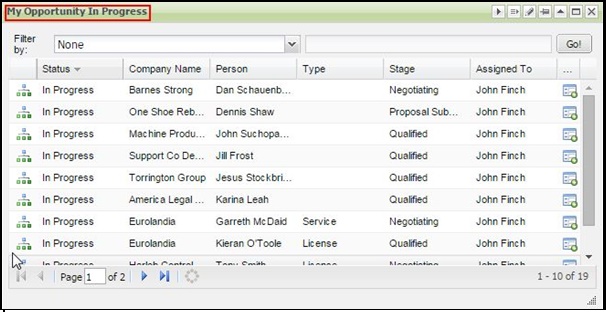
When you set the New Email action, the gadget will have Email icon in the first column.  (Refer below screenshot)

Img4
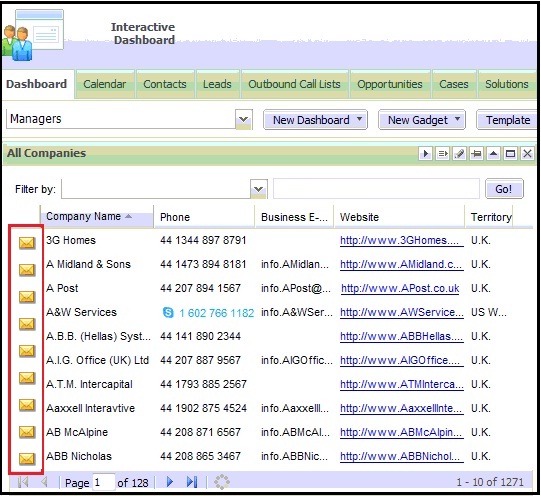
By clicking on any mail icon, Sage CRM Email editor will pop up enabling the user to send mails. The customer email address also gets auto populated in the ‘To’ field.  (Refer below screenshot).

Img5
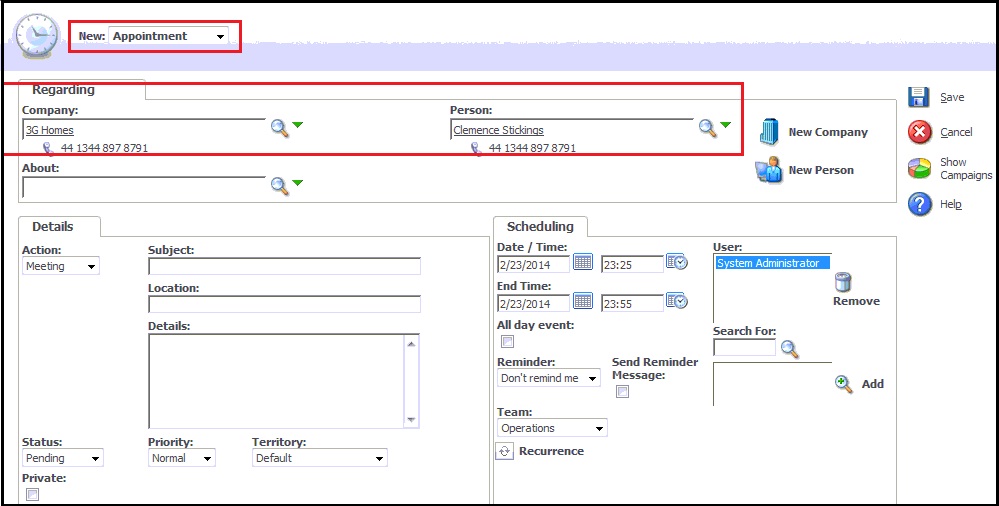
4) Drill Down = New Appointment
New appointments set will be shown in the first column (Refer below screenshot) when the option of ‘New Appointment’ is selected from the Drill Down tab.

Img6
By clicking of a button, New Appointment screen auto populates with Company and its Primary person in the respective fields. Refer below screenshot.

Img7
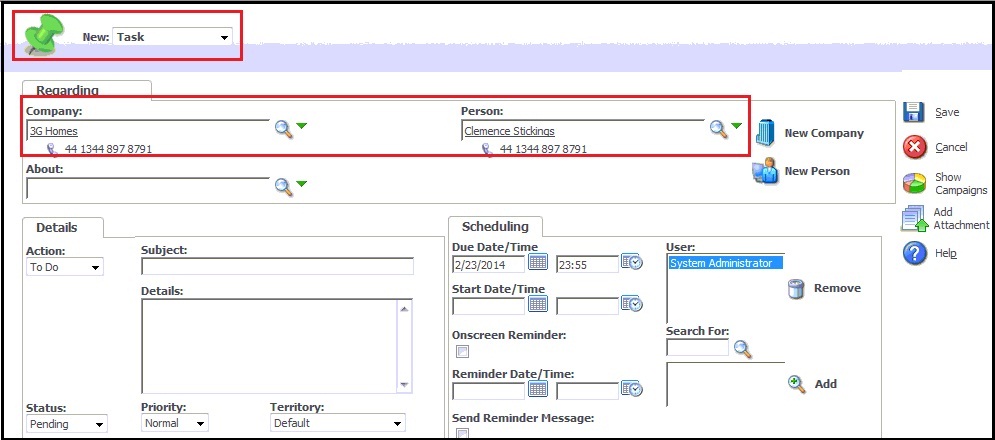
5) Drill Down = New Task
Similarly, when New Task action is selected in the Drill Down option, the Task icon will be shown in the gadget list.

Img8
Clicking on this icon, you will be navigated to New Task screen as shown below.

Img9
This is an easy and effective way to customize dashboard gadgets. One can easily set Default Actions to open screens and create communications.

Other Dashboard Related Posts:
1) Create Linked Gadgets to get related information on CRM Dashboard
2) Market Trend Right On Your Dashboard
3) Sales Funnel on Dashboard Sage CRM 7.2
4) Handling Blog feeds in Sage CRM
5) Progressing workflows through Interactive Dashboard


With Sage CRM you have “Better Control Over your Customers and your Systems too”

$
0
0

Sage CRM can be easily configured to restrict users for certain areas, screens, tabs etc. In one of the forums we have been asked if Dashboard tab can be restricted for certain users. In the past, we have read how to restrict Sage CRM user access to GUMU Dashboard with GUMU Security matrix.

Our Other Blogs: Sage ERP X3 | Sage 300 ERP | Salesforce.com

Now let’s see a way how the standard ones are controlled in Sage CRM. In Sage CRM each user has to create his own dashboard; hence one user cannot see the dashboard data of other users. There are few users in Sage CRM who will be using Dashboard tab and some who will never use dashboards; hence it has been asked that if there is a trick to restrict the same user wise.

Here the steps with which Dashboard tab can be restricted for certain users.

Step 1: Create a field in User entity
1) Login into Sage CRM using Admin user.
2) Navigate to Administration | Customization.
3) Select Users entity from the Secondary entities dropdown and select Fields tab.
4) Create a new checkbox field say (user_ShowDashboard) using New button which is available under Fields tab.

Image1

Step 2: Add field in More User Details box
1) Navigate to Administration | Customization | Users | User Admin Extra Box.
2) Select Show Dashboard field created in Step 1 from Field dropdown and Click on Add button.

Image2

3) Click on Save button to Save changes.
4) Once added it will be available in the User More Details block of User Details tab as shown below.

Image3
Administrator user has to check the same for all users to whom he needs to keep the Dashboard tab access and keep unchecked for users who will not have Dashboard tab access.
5) In addition to this, you also need to change Log Me In To settings (As it takes user to Dashboard screen when set as Dashboard) under User Preferences if you do not want Dashboard tab to be visible for a user.

Image5
Step 3: Add SQL condition to restrict tab access
1) Navigate to Administration | Advanced Customization | System Menus.
2) Select User Tab Group Name.
3) Select the Dashboard tab option & add below code is SQL field available in the Properties block as shown below.
User_ShowDashboard=’Y’
4) Click on Update button.
5) Click on Save button.

Same steps can be applied to restrict the Tab access for user of any other Sage CRM standard tabs as well as Custom tabs.

Other Dashboard Related Posts:
1) Interactive Dashboards to help day to day CRM tasks
2) Sales Funnel on Dashboard Sage CRM 7.2
3) Create Linked Gadgets to get related information on CRM Dashboard
4) Market Trend Right On Your Dashboard
5) Handling Blog feeds in Sage CRM

Sage 300 Order Details in Sage CRM Dashboard

$
0
0

Sage CRM provides a very powerful and effective feature of dashboard which can be used to monitor the business processes at a quick glance to provide an instant overview of key elements of business performance.

Read our other dashboard related posts at the end of the blog.

In this blog, we will explain the steps to show Sage 300 Orders and Order Details in Sage CRM dashboards using Sage 300 SDATA feed.

Quickly Copy Sage ERP X3 Development Objects using Dictionary Copy to another Folder
Greytrix Sage ERP X3 Blog

1) Click on the Create Gadget button on Dashboard tab.

Img1
2) SDATA List from the Gadget wizard.

Img2
3) Following screen will show where you would be required to enter SDATA feed URL which will show the Order details.

Img3
Enter the following details here,
a) Web Address : http://<<Server>>/SDataServlet/sdata/sageerp/accpac/SAMINC/oeorders/$schema
b) Name : Name of Gadget
c) User Name : Sage 300 Username
d) Password : Sage 300 User password
e) Click on Next button

Note: You need to ensure that the above link is accessible from Sage CRM.

4) Select Orders entity from the list of entity and click on Next button.

Img4
5) Select Columns from the list and click on Next button.

Img5
6) You will be prompted to the next screen to add filter. Kindly click on the Next button which will take you to the Step 5. Enter the Gadget details and click on Finish button.

Img6
You will observe that Sage 300 Orders will also be available in Sage CRM dashboard as shown below.

Img7
Sales Manager can even click on the Drill Down button (first column in the dashboard) to navigate to the Order Details as shown below.

Img8

This way Sales Managers have an ability to drill into details and can easily monitor business processes.

Other Dashboard Related Posts:
1) Interactive Dashboards to help day to day CRM tasks
2) Sales Funnel on Dashboard Sage CRM 7.2
3) Create Linked Gadgets to get related information on CRM Dashboard
4) Market Trend Right On Your Dashboard
5) Handling Blog feeds in Sage CRM

Customer Dashboard with LinkedIn search

$
0
0

LinkedIn is one of the most popular social networking sites for professionals, having over 100 million members from over 200 countries. LinkedIn is not only helpful for social networking, but also for searching new customers, suppliers, and vendors for your business. In today’s world it has become immensely important to track customer behavior and LinkedIn helps us with consolidated profile view of customer data.

Our new GUMU solution :  Sage CRM – Sage ERP X3 Integration > Architecture and Design

Sage CRM also provides basic LinkedIn integration through its Interactive Dashboard. Using this you can search and drill down customers profile on LinkedIn. Here is how you can configure it.

1) Go to Dashboard tab under “MyCRM

2) Select “Sales Dashboard” from the dropdown.

SCRN1

3) Click on New Gadget and Select Create Gadget.

4) Select “List” gadget from Gadget wizard.

SCRN2

5) After selecting “List” widget, Sage CRM will ask you to select the entity for which you want to display this gadget. Select “Person” entity and click on next button.

SCRN3

6)  Now you need to select the data on which you wish to base your gadget. Select “Person List by Company” from Report section and click on next button.

SCRN4

7) Select columns that you want to display in Gadget i.e. Specify how you want to format the data. Select the respective columns and click on next button.

SCRN5

8) Now most import thing is select the action you want to perform on the gadget. Select Default action as “Go to List Report” and Drill Down as “LinkedIn Search” and click on next button.

SCRN6

9)  Now Last step is nothing but the to set name and description for Gadget. Enter these details and click on “Finish” button. You will see on your dashboard new Customer Gadget with in button which looks like below.

SCRN7

10) Clicking on any of the contact will redirect you to the LinkedIn search page to search matching records for detailed profiling.

Also Read:
1) Customer Retention: The forgotten domain? Part – I
2) Twitter account under MyCRM SageCRM 7.2
3) Sage CRM 7.2 Facebook Component
4) Greytrix voted as First Sage Gold Development Partner of the Year for SageCRM at Sage Summit
5) Greytrix at Sage Summit Booth Number 326

User specific data on Interactive dashboards

$
0
0

Interactive dashboards add up to overall look and feel through which data is rendered to management users. Dashboards help review team’s performance over the time. However some users may want specific dashboards like Leads that are assigned to them only. Yes this is similar to Leads pipeline however I may want to keep tab on all high priority leads on my dashboard. Here is how you can quickly design such user specific dashboards.

New stuff: Migration of Act! Groups in Sage CRM

1. First step is to create a view for the data you want to look at. For example create SQL view on Lead entity with high priority leads. Set this view as Reports view.

2. Create new report based on this view named “High Priority Leads”. At the time of creating this report make sure to check the checkbox named “Filter by Current User” as shown below.

1

3. Now on your dashboard create a List gadget for Lead entity. On step 2 of 5 while creating dashboard select the report that you have created.

2

4. Adding this gadget to Sales Dashboard, every sales user will be able to see only his high priority leads.

5. As you see in above screenshot it can also be done using saved search. User can find Leads assigned to him and in High priority through Find Lead option. Then save the search criteria. These Saved searches are available at the time of creating gadget under “Saved Search” section.

Also Read:
1) Customer Dashboard with LinkedIn search
2) Sage 300 Order Details in Sage CRM Dashboard
3) Interactive Dashboards to help day to day CRM tasks
4) Create Linked Gadgets to get related information on CRM Dashboard
5) Show Chart Block On Classic Dashboard


360° Customer View on Sage CRM Interactive Dashboards

$
0
0

Sage CRM customizations allow you to expand the application so as to include extra information to help you manage customers efficiently. Some of the customizations help you in managing Service Calls, Customer Service, Supporting Tickets and so on.

New Stuff: Sage CRM builder – Future of Sage CRM Cloud

In this blog post, we will see how to have a 360° Customer View on Sage CRM Dashboards. Kindly follow below steps to create Dashboard Gadgets in Sage CRM.

1) Create a simple dashboard gadget that will display all companies of Sage CRM. You can refer our blog post on displaying list of companies available in Sage CRM. Here is the link. http://www.greytrix.com/blogs/sagecrm/2014/02/15/get-key-metrics-right-on-your-interactive-dashboard-using-saved-search/

2) Then create similar dashboards to display all Communications, Opportunities and Cases available in Sage CRM.

3) Now you just have to link Communications, Opportunities and Cases dashboard gadgets with Company gadget. You can refer our blog post on creating linked gadgets. Here is the link. http://www.greytrix.com/blogs/sagecrm/2014/02/15/create-linked-gadgets-to-get-related-information-on-crm-dashboard/

4) Once done, select any company from the Company Dashboard and it will display the related Communications, Opportunities and Cases of selected Company.

Dashboard1

Also Read:
1) User specific data on Interactive dashboards
2) Customer Dashboard with LinkedIn search
3) Market Trend Right On Your Dashboard
4) Sage 300 Order Details in Sage CRM Dashboard
5) Interactive Dashboards to help day to day CRM tasks

View Fusion Charts on Sage CRM Interactive Dashboards

$
0
0

In our earlier post, we had explained how to display Fusion charts using COM API and .NET API and add drill-down to the Fusion charts. In this blog post, we will be explaining how to add fusion charts to Sage CRM Interactive Dashboards.

New Stuff:  Profile Pictures for users on Sage CRM Dot Com

Consider an example where you want to display a Fusion chart on Leads assigned to the Users, as per their stage, and add that chart into an Interactive Dashboards. Follow below steps to achieve it.

1) Create a new Dashboard using New Dashboard button.

Dashboard1
2) Enter Name of the Dashboard and click on OK button.

Dashboard2
3) Then click on New Gadget button and select Web Site Gadgets from the list as shown below.

Dashboard3
4) You will be navigated to below screen. Enter Web Address as shown below.
http://GREY043/CRM/CustomPages/Test.asp

Here
GREY043 = Server Name
CRM = Sage CRM Instance Name

Dashboard4

Kindly note that you need to design ASP page so that it will display Fusion Chart as requested. You can refer our blog post on this for assistance. Here is the link.
XML based Fusion Charts using .NET API
XML based Fusion charts in COM API

5) Click on Next button and enter name of the Gadget as shown below.

Dashboard5
6) Finally, click on Finish button and you will get the Fusion charts displayed within Sage CRM Dashboard as shown below.

Dashboard6

You can further customize fusion charts to add drill-down links. Refer our blog post on the same.
http://www.greytrix.com/blogs/sagecrm/2014/05/16/adding-drill-down-links-to-fusion-charts/

This way, you can add any fusion charts to Sage CRM Dashboard for any Primary, Secondary or Custom entity.

Also Read:
1) Adding drill-down links to Fusion Charts
2) XML based Fusion Charts using .NET API
3) Show Chart Block On Classic Dashboard
4) Generating a Simple Pie chart in Sage CRM using COM API
5) Re-Organization Charts

Sales Metrics for Managers in Sage CRM 7.3

$
0
0

In our last post Sales KPI dashboard in Sage CRM 7.3, we read about dashboards available in latest release of Sage CRM which are termed as Business Accelerators. Today, we will discuss one more type of dashboard which can be used by managers to get the better picture of the organization and current position of sales. This dashboard is called as Sales Metrics for Managers.

Download Greytrix Sage CRM v7.3 integrations for
Sage ERP X3 (Integrates v7/6.5 with CRM v7.3/7.2)  | Sage 100 (MAS90)  |  Sage 500 (MAS500)

Well, this dashboard contains gadgets of different data which help us to measure progress towards your organization’s goals. See below screenshot for reference.

IMG1

This dashboard has below gadgets by standard:

1. Deals Lost to Competitors: This is built though horizontal bars. Using this gadget you can see deals that your organization was bidding on but lost to a competitor. The report is based on the new Competitor, Winner, and Reason for Loss fields in each opportunity record.

2. Average Deal Close Rate: This is built through horizontal bars. Using this gadget you can see the amount of time between a new opportunity being created and closed. The information is grouped by sales rep.

3. Leads Generated by Source: This gadget shows how leads are available in system and how they were sourced accordingly.

4. Won vs Lost Deals: This gadget shows opportunities that each sales rep has Won and Lost in a specified period of time.

Also Read:

1. User specific data on Interactive dashboards
2. View Fusion Charts on Sage CRM Interactive Dashboards
3. 360° Customer View on Sage CRM Interactive Dashboards
4. Customer Dashboard with LinkedIn search
5. Sage 300 Order Details in Sage CRM Dashboard


Actual vs Target Meter Dashboard Year wise

$
0
0

Reporting is the most essential part of any organization which improves business intelligence, decision making and knowledge management. When it comes to reporting mechanism of Sage CRM, I will say it is one of the best reporting tool. The latest version 7.3 of Sage CRM has bring lot of new dashboards and inbuilt reports which is helping business to analyze their data quickly, set up your goals and taking decisions. Actual Vs Target Dashboard is one of them.

New Stuff: Prepayment Process in CRM

In recent implementation, we came across one such scenario where customer wants Target Vs Actual dashboard should display target data on Yearly basis. By default it shows month wise target for that particular sales user.

I searched this particular report in report category and found the same under “Dashboard” report category. After analyzing this report I came to know that it was running on one particular Search Criteria. I simply changed that criteria and it worked for me. I followed below mentioned steps.

1) Go to Reports | Dashboards | Actuals vs. Target (Dashboard)
2) Click on Edit button of Actuals vs. Target (Dashboard).
3) It will display Report Details screen. Simply click on Continue button.
4) Next window will display search criteria for this particular report. Select “Between” option and put appropriate date value in date field. Refer below screenshot.

Sceenshot1

5)  Click on Continue button and Save the report and run the report. You will get target data in yearly manner.

Sceenshot2

Hope you like this.

Also Read:

1. View Sage CRM Reports in PDF format from any Sage CRM screen
2. Get impressive PDF Reports by adjusting Report Styles in Sage CRM – Part 2
3. Include your Company Logo in Sage CRM Reports
4. Historical Reports – Opportunity Closing History
5. Steps to generate complex reports in Sage CRM using Advanced Find


Error exporting reports to excel in CRM part 4

$
0
0

As you know we have been writing blogs on issues being faced while extracting reports data in excel and issues related to Dashboards not working. You can go through the links added below for your reference.

Related Stuff: Error exporting reports to excel in CRM part 3

Even in today’s blog, we will be discussing issue related to tomcat service which was running perfectly but users were not able to use Dashboards and Export to excel functionality.

To check the occurrence of this issue, we have gone through the various forums and blogs written on this particular topic. But, found the configuration which was supposed to be available under JDBC file was correct.

Below is the SQL Server configuration available under JDBC file.

IMG1

After some trial and error method, I just made a small change in the file by removing the Server instance and then restarted the tomcat service and everything started working smoothly. Below is the modified file for your reference.

IMG2

Here, in this file instead of mentioning Server name we can enter IP address of the server followed by same configuration..

Hope this helps!

Also Read:
1) Restricting Reports data to authorized users
2) Apache Tomcat Java configuration issues
3) Error exporting reports to excel in CRM part 2
4) Error exporting reports to excel in CRM
5) Error Opening PDF files in Internet Explorer 9


Restrict Web Sites in Sage CRM Dashboard Website Gadget

$
0
0

Every Oraganization has their own rules and regulations or we can say Organization policy which must be followed by their employees. For Example, Lets say according to the Organization rules and regulations or Policy, Organization employee should not be able to access any unwanted website in Sage CRM. Sage CRM Dashboard Gadgets allows to configure Web Sites, their feeds etc. There is a way to restirct web sites in Sage CRM Web Site Gadget. In this blog, we will explain how it can be done.

New Stuff: Customize Company screen of Sage CRM Mobile App

Sage CRM Administrator can supervise Activity of each and every user of Sage CRM. Sage CRM user can  configure any Web Site in Dashboard Web Site Gadget as needed. Refer below screenshot for more details.

Image1
Sage CRM System Administrator users can even restrict from accessing specifc web sites in Dashboard Gadget. There is a System Parameter in Sage CRM database which can be viewed by executing below query.

SELECT Parm_Value * FROM custom_sysparams WHERE Parm_Name = ‘InteractiveDashboardUrlBlacklist’

Administrator can block this web sites access by updating this parameter in Sage CRM Database. Administrator can simply enter below URL to block or restrict all sites that are start with espncricinfo.
http://www.espncricinfo.com.*

Administartors can update into database using below SQL query.
update Custom_SysParams set Parm_Value = ‘http://www.espncricinfo.com.*’ where parm_id=443

Note:
Parm_Id may be different for each database. Needless to say  do backup Sage CRM database before implementing any chnages.

Once it is done, do the Metadata Refresh and you will observe that dashbaord will show below message if Sage CRM users try to add Web Sites in Dashboard Gadgets.

Image2
Using above steps, Sage CRM Administrator can restrict any Web Sites in Dashboard Gadgets for all Sage CRM users.

frustrated with your ERP CRM

About Us:

Greytrix is one stop solution provider for Sage ERP and Sage CRM needs. We provide complete end-to-end assistance for your technical consultations, product customizations, data migration, system integrations, third party add-on development and implementation expertise.

Greytrix has some unique integration solutions for Sage CRM with Sage ERP’s (Sage X3Sage 100Sage 500 and Sage 300). It also offers best-in-class Sage ERP customization and development services to Business Partners, End Users and Sage PSG worldwide.

Greytrix helps in migrating to Sage CRM from ACTGoldmine and other CRM’s.

For more information on our integration solutions, please contact us at sage@greytrix.com. We will be glad to assist you.

Also Read:
1) Monitoring Sales Team performance with the help of Dashboard
2) Actual vs Target Meter Dashboard Year wise
3) Sales KPI dashboard in Sage CRM 7.3
4) View Fusion Charts on Sage CRM Interactive Dashboards
5) 360° Customer View on Sage CRM Interactive Dashboards

Display Logged in Users List in Sage CRM Dashboard

$
0
0

In earlier posts, we had explained how Interactive Dashboards can be used within Sage CRM and perform daily tasks in well-organized manner.

New Stuff: Restrict Inactive Companies & Contacts when Adding a New Case

Suppose System Administrator wants to perform certain activity in Sage CRM without disturbing any users. Then he can view how many users are logged into Sage CRM at that time by viewing his Dashboard. Below are the steps that needs to be followed to create Dashboard.

1) Login to Sage CRM and navigate to Administration | Customization | Activity.
2) Select Views tab and create a new view vCurrentUsers as shown below.

D1
3) Make sure that SDATA View checkbox is checked so that we can use this view to create SDATA Gadget. Save the view by clicking on Save button.
4) Next step will be to Add New Gadget in an Interactive Dashboard. For this, navigate to Templates | Gadget Templates as shown below.

D2
5) Below screen will get displayed and click on New button.

D3
6) Then Select SData List from the Gadget Type as shown below.

D4
7) Below screen will get displayed. Select Use SageCRM Data Feed.

D5
8) Click on Next button and select vCurrentUsers from Entity list.

D6
9) Select the columns that you wanted to be appear in Dashboard.

D7
10) Proceed using Next button and then enter the Gadget Details. Finally click on Finish button as shown below.

D8
11) To view the Gadget in Dashboard, Create a New Dashboard and Enter Dashboard Name as shown below.

D9
12) Clicking on OK button; user will be presented to select Dashboard Gadget. Kindly select the newly prepared Gadget and click on OK button.

D10
Once done, user can view list of all users that are currently using Sage CRM. System Administrator can even get in touch with users by calling them and performing his activity.

D11
Also Read:
1) Add Calendar Gadget in an Interactive Dashboard in Sage CRM
2) Restrict Web Sites in Sage CRM Dashboard Website Gadget
3) Monitoring Sales Team performance with the help of Dashboard
4) 360° Customer View on Sage CRM Interactive Dashboards
5) User specific data on Interactive dashboards

Assign User to specific Dashboard Template

$
0
0

The dashboard is a highly-customizable workspace where you control what information you need to see to be effective in your job. We can create multiple dashboards and gadgets by choosing the feeds, workflow, and actions you want to drive from your workspace, or select predefined gadgets and dashboards from templates.

In this blog we will see how we can assign a Users to a dashboard, so that he/she will able to see the dashboard which will help to him/her to access information on single click after login into CRM.

New Stuff: Features to manage Images through Sage CRM – Part 3

We can achieve this as follows-

1) Click on Template, select Dashboard Template.

IMG01

2) Click on New and enter details in Properties section i.e. Type, Name, Description, Category and then Save. Add Gadgets accordingly.

IMG02

3) Go to Dashboard Template. You will find template created by you in respective category. Select dashboard you want to assign users to.

4) Select the Assigned Users tab, click on Assign button to populate list of Users.

IMG03

5) Select the check box next to the user and Save.

IMG04

Now, when that user access his CRM account then he/she will find the dashboard which their respective data available.

Also Read:
1) Display Logged in Users List in Sage CRM Dashboard
2) Add Calendar Gadget in an Interactive Dashboard in Sage CRM
3) Dashboard and Real time Inquiry information
4) Progress Opportunity through Dashboard
5) Actual vs Target Meter Dashboard Year wise


Interactive Dashboard – Permission Denied Issue

$
0
0

Interactive Dashboard is one of the advance, essential and effective feature provided by Sage CRM 7.3. This version has brought lot of new dashboards and inbuilt reports. Sales Dashboard is one of them and it is available by default.

In today’s blog I will explain you how I resolved permission denied issue appearing in Sales Dashboard.

New Stuff: Assign User to specific Dashboard Template

Recently, I was working on modifying Sales Dashboard for one of our existing customer. I came across one strange issue where it was showing permission denied” issue for one of the report gadget. Kindly refer below screenshot.

Screen1

I started investigating in report section but did not found anything wrong in that. I have also cross verified profile and territory structure of that particular user and that was also looking fine.

Then I checked Security Panel in user configuration, I found Reports Rights was set to “Personal”.
I simply changed it to “Enterprise”.

Now guess what? That was the resolution. My dashboard report started working fine and was showing perfect data which was expected to me.

Screen3

Also Read:
1) Display Logged in Users List in Sage CRM Dashboard
2) Add Calendar Gadget in an Interactive Dashboard in Sage CRM
3) Dashboard and Real time Inquiry information
4) Restrict Web Sites in Sage CRM Dashboard Website Gadget
5) Progress Opportunity through Dashboard

Viewing My Opportunities on Interactive Dashboard

$
0
0

Sage CRM has an inbuilt Interactive Dashboard which is used to display Sage CRM data. Sage CRM User can view his Tasks, Opportunities through Dashboards. In this blog, we will explain how user can view his ongoing Opportunities in an Interactive Dashboard.

New Stuff: How to control Email Forward and Reply Translations

Below are the steps that you need to follow.
1) User can Create Gadget using New Gadget button on Interactive Dashboard.

1
2) Select List Gadget from Gadget Wizard as shown below.

2
3) Below screen will be presented where user can select Opportunity entity.

3
4) Click on Next button and select My Opportunities in Progress which is available under Saved Search folder as shown below.

4
5) On clicking the Next button, user can select fields that he wanted to display in an Interactive Dashboard.

5
6) Click on Next button to select action that needs to be perform on Gadget as shown below.

6
7) Enter Gadget details and click on Finish button.

7
Once done, you will have all In Progress Opportunities available into Dashboard Gadget as shown below.

8
Similar steps can be followed to display data from other entities on Interactive Dashboard.

Also Read:
1) Interactive Dashboard – Permission Denied Issue
2) Display Logged in Users List in Sage CRM Dashboard
3) Progress Opportunity through Dashboard
4) Dashboard and Real time Inquiry information
5) Add Calendar Gadget in an Interactive Dashboard in Sage CRM


Notify Restricted Websites List to Sage CRM users using Web Site Gadget

$
0
0

In earlier blog, we have explained how to Restrict Web Sites in Sage CRM Dashboard Website Gadget. In this blog, we will explain how to display the restricted sites in an Interactive Dashboard Gadget.

New Stuff: Viewing My Opportunities on Interactive Dashboard

1) To display restricted websites in Dashboard, we need to create .html files under Static Content folder of Sage CRM Installation Directory.

R1

2) Open file in notepad and add the names of all restricted websites.

R2

3) Navigate to Sage CRM Dashboard and create Dashboard Gadget and select Web Site Gadget from list as shown below.

R3

4) Navigate to Sage CRM Dashboard and create Dashboard Gadget and select Web Site Gadget from list as shown below.

R4

5) Click on Next button and enter Gadget Name as shown below.

R5

6) Once done, you will get list of all Restricted Sites available on Interactive Dashboard as shown below.

R6

Administrator can configure Restricted Websites as explained above and have this Gadget available to all Sage CRM users.

Also Read:
1) Restrict Web Sites in Sage CRM Dashboard Website Gadget
2) Actual vs Target Meter Dashboard Year wise
3) Sales KPI dashboard in Sage CRM 7.3
4) View Fusion Charts on Sage CRM Interactive Dashboards
5) 360° Customer View on Sage CRM Interactive Dashboards

Get Dropbox Event updates into Sage CRM Interactive Dashboard Gadget

$
0
0

Dropbox is a place where we love to keep or store our document, files and video so that we can view them anytime anyplace. Dropbox also make it super easy to share files with other peoples by just providing the Dropbox link to the other people using which people can directly download the file.

New Stuff: Notify Restricted Websites List to Sage CRM users using Web Site Gadget

A user can view all Dropbox events available in RSS format into Sage CRM and by displaying it in RSS Dashboard without any additional coding.

All you would need to do is create an RSS Feed Dashboard Gadget. Enter the RSS feed link and authentication to using the provided Dropbox credentials in the RSS Feed Gadget and you would be able to see something like this.

Now to find Dropbox RSS Feed Link User need to redirect to Dropbox Home Page >> Event folder.

Here you will find an RSS Symbol3 on click user will get the Link displayed. Copy the link and paste it in the Web Address field displayed in Gadget Wizard while creating the RSS Feed Gadget and enter the authentication Username and Password.

Dropbox RSS Feed link will be displayed in below format: [https://www.dropbox.com/5432211/879318657/pAoDHQNcZMmZSgxj12mB864PEbBqsznALWHaQ1RH/events.xml]

2

Adding the above Gadget will help you to keep track of the files that gets added into the Dropbox by you or by other user via Dropbox Plugins.

Also Read:
1) Add Calendar Gadget in an Interactive Dashboard in Sage CRM
2) User specific data on Interactive dashboards
3) Interactive Dashboards to help day to day CRM tasks
4) Get key metrics right on your Interactive Dashboard using Saved Search
5) Progressing workflows through Interactive Dashboard

Remove Gadget Name from Dashboard

$
0
0

Sage CRM has an inbuilt Interactive Dashboard which is used to display Sage CRM data. Sage CRM User can view Reports and Charts with Gadget Name. In this blog, we will explain how we can remove Gadget Name in an Interactive Dashboard.

New Stuff: Provision to review MOM details right from the Dashboard

Below are the steps that you need to follow:
1. Go to “<installationpath>\WWWRoot\Themes\gwtext_shared\ergonomic\theme.css”.
2. Search the .x-panel-header-text or go to line number 537 and change font: 13px Arial To font: 0px Arial. After changing css close browser and log in again in Sage CRM.

Before make changes in CSS File.

1.Before Change Code

After make changes in CSS File.

2.After Change Code

Before make changes in CSS File Screen.

3.Before Change Code Screen

After make changes in CSS File Screen.

4.After Change Code Screen

Also Read:

1. Add Calendar Gadget in an Interactive Dashboard in Sage CRM
2. Restrict Web Sites in Sage CRM Dashboard Website Gadget
3. Get Dropbox Event updates into Sage CRM Interactive Dashboard Gadget
4. User specific data on Interactive dashboards
5. Interactive Dashboards to help day to day CRM tasks

Remove Toolbox from Gadgets in Interactive Dashboard

$
0
0

Interactive Dashboard feature of Sage CRM 7.3 is one of the most powerful and useful feature designed yet by Sage. Variety of gadgets, lists, charts are easily available and by configuring them together we can build various reports based on our need. One more useful thing is you can control it’s CSS as well in order to display gadgets as per your requirement. In today’s blog, I will explain you how to remove toolbox from gadgets by using css.

New Stuff: Remove Gadget Name from Dashboard

Recently, in one of our implementation we came across a scenario where customer had asked us to remove toolbox from every gadget on dashboard. Requirement was very strange but still we thought this as challenge as started working on it.

Initially we thought that there should be some configuration in CRM from where we can control toolbox functionality but we could not find the same. As an alternative, we started looking from designed point of view and looked for css.

After some research, we were able to find that particular .css file who is mainly responsible for controlling toolbox functionality. We modified this file and able to meet our requirement. Please refer below given steps for the same.

1. Initially you will see standard dashboard with toolbox as per below screenshot.

Screen1

2. Go to your CRM’s root directory (where you have installed CRM).
“WWWRoot\Themes\gwtext_base\resources\css”
3. Look for “ext-all.css” file.
4. Go to line no 692 where you will find below code written.
“.x-tool{overflow:hidden;width:15px;height:15px;float:right;cursor:pointer;background:transparenturl(../images/default/panel/tool-sprites.gif) no-repeat;margin-left:2px;}”
5.  Set value of width parameter as 0 i.e. width:0px.
6. Clear your browser cache and log into the CRM. You will see dashboard gadgets without toolbox. Refer below screenshot.

Screen2

Also Read:

1. Display Logged in Users List in Sage CRM Dashboard
2. Add Calendar Gadget in an Interactive Dashboard in Sage CRM
3. Dashboard and Real time Inquiry information
4. Restrict Web Sites in Sage CRM Dashboard Website Gadget
5. Progress Opportunity through Dashboard

Hide Interactive Dashboard Panel for Non Admin User

$
0
0

As we know the Interactive dashboard of Sage CRM is a wonderful feature that allows us to have immediate access to a wide variety of information. With the Sage CRM interactive dashboard, users can manage all their activity from one place. This includes their calendar, their tasks, their lists, their opportunity and web and RSS feeds throughout your organization and enabling your staff to accomplish more from a tailored workspace that combines the information they use every day.

New Stuff: Displaying Popup window in Sage CRM 7.2 Using Client side API

In this blog will explain you how to hide interactive dashboard Panel for non admin user in sage crm which restrict user from creating new dashboard, new gadget and templates.

Basically you will see standard dashboard with Panel as shown in below screenshot.

Image1To Hide dashboard panel follow below steps.

1. Go to “<installation path>\WWWRoot\Interactive Dashboard”.
2. Open “InteractiveDashboard.asp” page.
3. Paste below code after HTML End.

<script>
$(function(){
setTimeout(function(){
if(crm.CurrentUser.user_userid!=”1″){
$(“.x-table-layout td.x-table-layout-cell”).each(function(){
$(this).hide(); })
} },3000);
});
</script>

Once you have added above code, Login to the Sage CRM and you can see that interactive dashboard panel are not visible for the non admin user as per the below screen shot.

Image2

Also Read:

1. Remove Toolbox from Gadgets in Interactive Dashboard
2. Get Dropbox Event updates into Sage CRM Interactive Dashboard Gadget
3. Hide New Dashboard, New Gadget and Template from Interactive Dashboard for Non Admin User
4. Remove Gadget Name from Dashboard
5. Provision to review MOM details right from the Dashboard

Viewing all 48 articles
Browse latest View live